
Introduction
This project is to find the important keypoints on a face by using OpenCV and CNN. After finding the keypoints, the program generate the image and camera stream to wear sunglasses using keypoints on the faces. In the middle of this blog, I will compare the performance among the various deep learning models.
Process
- Step 0: Import datasets
- Step 1: Build CNN model to find keypoints on face
- Step 2: Compare various CNN models
- Step 3: Face Detection with OpenCV
- Step 4: Final product
Environment
- Laptop with CUDA
- Jupyter Notebook
- Python 3.5, Keras 2.2, TensorFlow-gpu 1.8
Step 0: Import Datasets
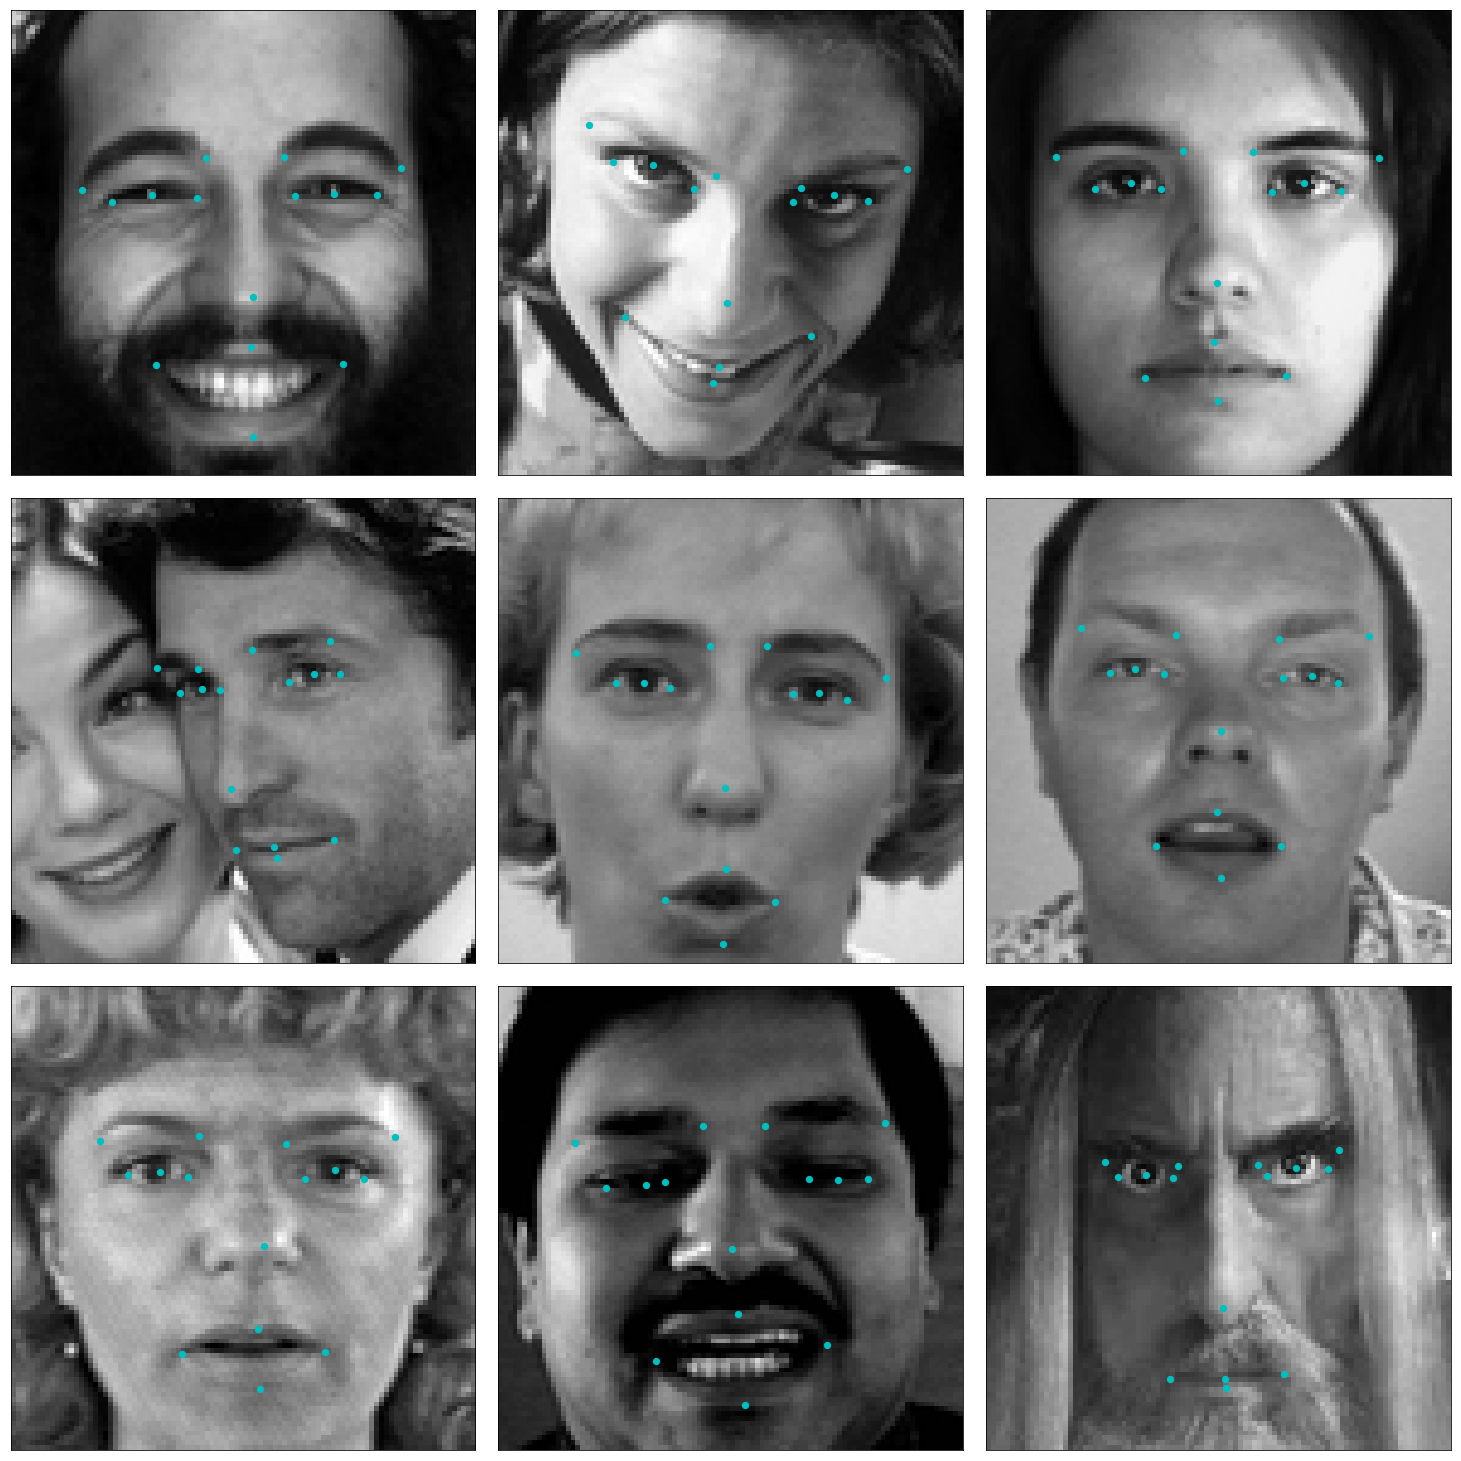
I used dataset from KaggleKaggle. The dataset is composed of 2140 train set and 1784 test set. The csv data point file contains 15 keypoints(x, y values) and 96x96 image gray color values(0-255) with 1 channel. And each image is a 96x96 face image with 1 channel (gray). The dataset is normalized to make better training. Color value is normalized between 0.0 and 1.0 and x, y values for key points on face are normalized between -1.0 and 1.0.
from utils import *

# Load training set
X_train, y_train = load_data()
print("X_train.shape == {}".format(X_train.shape))
print("y_train.shape == {}; y_train.min == {:.3f}; y_train.max == {:.3f}".format(
    y_train.shape, y_train.min(), y_train.max()))

# Load testing set
X_test, _ = load_data(test=True)
print("X_test.shape == {}".format(X_test.shape))
X_train.shape == (2140, 96, 96, 1)
y_train.shape == (2140, 30); y_train.min == -0.920; y_train.max == 0.996
X_test.shape == (1783, 96, 96, 1)
Visualize the training data
import matplotlib.pyplot as plt
%matplotlib inline

fig = plt.figure(figsize=(20,20))
fig.subplots_adjust(left=0, right=1, bottom=0, top=1, hspace=0.05, wspace=0.05)
for i in range(9):
    ax = fig.add_subplot(3, 3, i + 1, xticks=[], yticks=[])
    plot_data(X_train[i], y_train[i], ax)
Step 1: Build CNN model to find keypoints on face
I tried to test various models to get the better result. I tested single and multiple conv + maxpool layers with 1~3 fully connected layers at the end of model. I also tested dropout to generalize on conv layer which isn’t work because conv layers is already generalized itself (conv layers’s local connectivity). Dropout is applied to fully connected layer to reduce overfitting. I used ReLu activations through model except the final activation. I chose final activation as Tanh because final output is -1 to 1. The adaptive optimizer which is Adam was produced the best result. Loss function is applied mean squared error that can evaluate continuous numerical outputs. Early Stopping is used to stop when validation loss is not improved in few epochs. The below final model is inspired from VGG-16 and VGG-19.
# Import deep learning resources from Keras
from keras.models import Sequential
from keras.layers import Convolution2D, MaxPooling2D, Dropout
from keras.layers import Flatten, Dense

model = Sequential()

model.add(Convolution2D(filters=16, kernel_size=3, padding='same', activation='relu',
                       input_shape=(96, 96, 1)))
model.add(Convolution2D(filters=16, kernel_size=3, padding='same', activation='relu'))
model.add(MaxPooling2D(pool_size=2))

model.add(Convolution2D(filters=32, kernel_size=3, padding='same', activation='relu'))
model.add(Convolution2D(filters=32, kernel_size=3, padding='same', activation='relu'))
model.add(MaxPooling2D(pool_size=2))

model.add(Convolution2D(filters=64, kernel_size=3, padding='same', activation='relu'))
model.add(Convolution2D(filters=64, kernel_size=3, padding='same', activation='relu'))
model.add(Convolution2D(filters=64, kernel_size=3, padding='same', activation='relu'))
model.add(MaxPooling2D(pool_size=2))

model.add(Convolution2D(filters=128, kernel_size=3, padding='same', activation='relu'))
model.add(Convolution2D(filters=128, kernel_size=3, padding='same', activation='relu'))
model.add(Convolution2D(filters=128, kernel_size=3, padding='same', activation='relu'))
model.add(MaxPooling2D(pool_size=2))

model.add(Flatten())
model.add(Dense(512, activation='relu'))
model.add(Dropout(0.5))
model.add(Dense(30, activation='tanh'))

# Summarize the model
model.summary()
| Layer (type) | Output Shape | Param # |
|---|---|---|
| conv2d_11 (Conv2D) | (None, 96, 96, 16) | 160 |
| conv2d_12 (Conv2D) | (None, 96, 96, 16) | 2320 |
| max_pooling2d_5 (MaxPooling2 | (None, 48, 48, 16) | 0 |
| conv2d_13 (Conv2D) | (None, 48, 48, 32) | 4640 |
| conv2d_14 (Conv2D) | (None, 48, 48, 32) | 9248 |
| max_pooling2d_6 (MaxPooling2 | (None, 24, 24, 32) | 0 |
| conv2d_15 (Conv2D) | (None, 24, 24, 64) | 18496 |
| conv2d_16 (Conv2D) | (None, 24, 24, 64) | 36928 |
| conv2d_17 (Conv2D) | (None, 24, 24, 64) | 36928 |
| max_pooling2d_7 (MaxPooling2 | (None, 24, 24, 64) | 0 |
| conv2d_18 (Conv2D) | (None, 12, 12, 128) | 73856 |
| conv2d_19 (Conv2D) | (None, 12, 12, 128) | 147584 |
| conv2d_20 (Conv2D) | (None, 12, 12, 128) | 147584 |
| max_pooling2d_8 (MaxPooling2 | (None, 6, 6, 128) | 0 |
| flatten_2 (Flatten) | (None, 4608) | 0 |
| dense_3 (Dense) | (None, 512) | 2359808 |
| dropout_2 (Dropout) | (None, 512) | 0 |
| dense_4 (Dense) | (None, 30) | 15390 |
Total params: 2,852,942
Trainable params: 2,852,942
Non-trainable params: 0
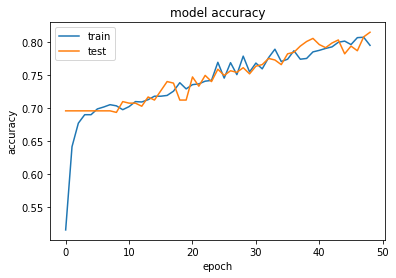
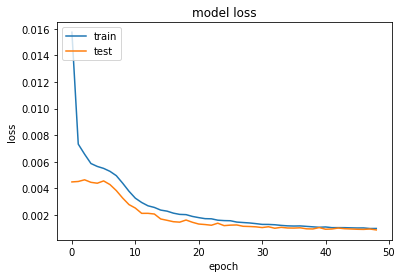
Training and loss/ accuracy
from keras.optimizers import SGD, RMSprop, Adagrad, Adadelta, Adam, Adamax, Nadam
from keras.callbacks import EarlyStopping, ModelCheckpoint

adam = Adam() #Adam(lr=0.001, beta_1=0.9, beta_2=0.999, epsilon=None, decay=0.0, amsgrad=False) default epsilon = 1e-07
model.compile(optimizer=adam, loss='mean_squared_error', metrics=['mae', 'acc'])

earlystop = EarlyStopping(monitor='val_loss', min_delta=0.0001, patience=10, verbose=1, mode='auto')
checkpointer = ModelCheckpoint(filepath='best_my_model.hdf5')
callbacks_list = [earlystop, checkpointer]

hist = model.fit(X_train, y_train, batch_size=16, epochs=3000, verbose=2,  callbacks=callbacks_list, validation_split=0.2, shuffle=True)

model.save('my_model.h5')
Epoch 44/3000 - 145s - loss: 0.0010 - mean_absolute_error: 0.0239 - acc: 0.8002 - val_loss: 9.6063e-04 - val_mean_absolute_error: 0.0219 - val_acc: 0.8037
Epoch 45/3000 - 140s - loss: 0.0010 - mean_absolute_error: 0.0237 - acc: 0.8020 - val_loss: 9.4013e-04 - val_mean_absolute_error: 0.0217 - val_acc: 0.7827
Epoch 46/3000 - 145s - loss: 0.0010 - mean_absolute_error: 0.0235 - acc: 0.7967 - val_loss: 9.1961e-04 - val_mean_absolute_error: 0.0214 - val_acc: 0.7944
Epoch 47/3000 - 147s - loss: 0.0010 - mean_absolute_error: 0.0237 - acc: 0.8072 - val_loss: 9.0973e-04 - val_mean_absolute_error: 0.0213 - val_acc: 0.7874
Epoch 48/3000 - 148s - loss: 9.7474e-04 - mean_absolute_error: 0.0231 - acc: 0.8078 - val_loss: 9.3755e-04 - val_mean_absolute_error: 0.0216 - val_acc: 0.8084
Epoch 49/3000 - 149s - loss: 9.7831e-04 - mean_absolute_error: 0.0232 - acc: 0.7956 - val_loss: 8.6974e-04 - val_mean_absolute_error: 0.0210 - val_acc: 0.8154
Epoch 00049: early stopping
Step 2: Compare various CNN models
I tried many different model to get the better validation accuracy. We can check this through the below the table.
- Condition: MSE loss function, Adam optimizer, Early Stopping, ReLu Activation (except final layer), kernel size = 3x3, Dropout(Fully Connected layer) = 50%
- Note: the numbers on structure indicate the filter numbers
ex. C(32): Convolution2D(filters=32, kernel_size=3, padding=’same’, activation=’relu’)
MaxPooling2D(pool_size=2)
ex. C(32x2) = Convolution2D(filters=32, kernel_size=3, padding=’same’, activation=’relu’)
Convolution2D(filters=32, kernel_size=3, padding=’same’, activation=’relu’)
MaxPooling2D(pool_size=2)
ex. D(256) = Dense(256, activation=’relu’)
| Structure | Last Activation | Batch Size | Max Acc |
|---|---|---|---|
| C(32)-C(64)-C(128)-D(256)-D(1000)-D(30) | Tanh | 256 | 71.96% |
| C(32)-C(64)-C(128)-D(512)-D(30) | Tanh | 256 | 71.50% |
| C(32)-C(64)-C(128)-D(512)-D(30) | X | 256 | 71.03% |
| C(16)-C(32)-C(64)-C(128)-D(512)-D(30) | Tanh | 256 | 71.96% |
| C(16)-C(32)-C(64)-C(128)-D(512)-D(30) | X | 256 | 74.30% |
| C(16)-C(32)-C(64)-C(128)-D(512)-D(30) | X | 64 | 74.77% |
| C(16)-C(32)-C(64)-C(128)-D(512)-D(30) | X | 16 | 78.74% |
| C(16)-C(32)-C(64)-C(128)-D(512)-D(30) | Tanh | 16 | 75.93% |
| C(16x2)-C(32x2)-C(64x3)-C(128x3)-D(512)-D(30) | Tanh | 16 | 81.54% |
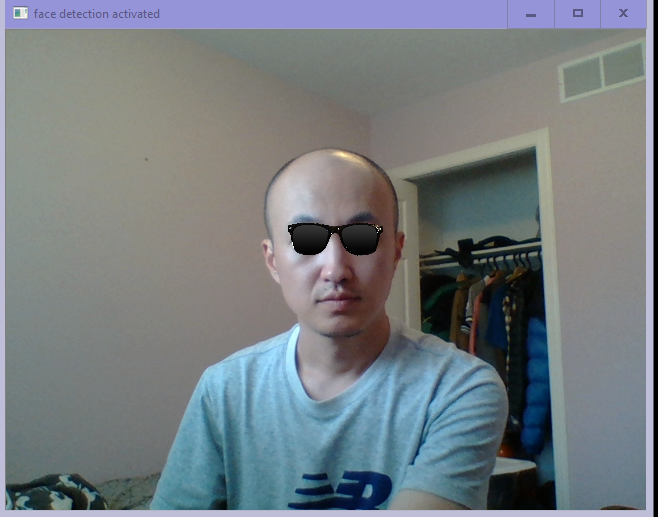
Step 3: Face Detection with OpenCV and wear sunglasses on the faces through camera stream.
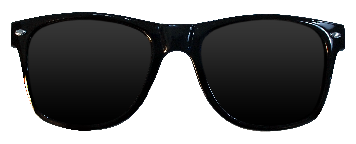
To feed the face into CNN model, we should insert 96x96 face image (gray) with normalization into input layer. So, I converted the color the original image to gray, extract the face using OpenCV cascade classifier and normalize the face image between 0.0 - 1.0. Finally I loaded a sunglasses image and place the sunglasses on face by using face Keypoints.
# Load in sunglasses image - note the usage of the special option
# cv2.IMREAD_UNCHANGED, this option is used because the sunglasses
# image has a 4th channel that allows us to control how transparent each pixel in the image is
import cv2
import matplotlib.pyplot as plt
%matplotlib inline
sunglasses = cv2.imread("images/sunglasses_4.png", cv2.IMREAD_UNCHANGED)

# Plot the image
fig = plt.figure(figsize = (6,6))
ax1 = fig.add_subplot(111)
ax1.set_xticks([])
ax1.set_yticks([])
ax1.imshow(sunglasses)
ax1.axis('off');
face_cascade = cv2.CascadeClassifier('detector_architectures/haarcascade_frontalface_default.xml')
def wear_suglasses(face_image, suglasses_image):
    gray_image = np.copy(face_image)
    gray_image = cv2.cvtColor(face_image, cv2.COLOR_RGB2GRAY)
    faces = face_cascade.detectMultiScale(gray_image, 1.25, 6)

    faces_cnn_data = np.ndarray(shape=(len(faces), 96, 96, 1), dtype='float', order='F')

    for i, (x,y,w,h) in enumerate(faces):
        faces_cnn_data[i, :, :, 0] = cv2.resize(gray_image[y:y+h, x:x+w], (96, 96), cv2.INTER_LINEAR) / 255

    faces_keypoints = model.predict(faces_cnn_data)

    for i, (x,y,w,h) in enumerate(faces):
        # rescale keypoints on face
        faces_keypoints[i, 0::2] = faces_keypoints[i, 0::2] * (w/2) + (w/2) + x
        faces_keypoints[i, 1::2] = faces_keypoints[i, 1::2] * (h/2) + (h/2) + y
        faces_cnn_data[i,:,:,0] = cv2.resize(gray_image[y:y+h, x:x+w], (96, 96), cv2.INTER_LINEAR) /  255

        # find sunglasses width and height
        w_sunglasses = int(np.linalg.norm(np.array(faces_keypoints[i, 5*2:5*2+2]) - np.array(faces_keypoints[i, 3*2:3*2+2])) * 1.20)
        h_sunglasses = int(suglasses_image.shape[0] / suglasses_image.shape[1] * w_sunglasses) # keep the w/h ratio

        # resize sunglasses
        resized_sunglasses = cv2.resize(suglasses_image[:,:,:], (w_sunglasses, h_sunglasses), cv2.INTER_LINEAR)

        # make mask for transparent area
        sunglasses_mask = resized_sunglasses[:,:,3] > 0

        # get suglasses x, y
        sunglasses_x = int(((faces_keypoints[i, 2*2] + faces_keypoints[i, 4*2]) / 2) - (w_sunglasses / 2))
        sunglasses_y = int(((faces_keypoints[i, 2*2 + 1] + faces_keypoints[i, 4*2 + 1]) / 2) - (h_sunglasses / 2))

        # replace the sunglasses on face
        face_image[sunglasses_y:sunglasses_y+resized_sunglasses.shape[0],
                     sunglasses_x:sunglasses_x+resized_sunglasses.shape[1],:][sunglasses_mask] = \
                     resized_sunglasses[:,:,0:3][sunglasses_mask]

    return face_image
import cv2
import time
from keras.models import load_model
import numpy as np

def laptop_camera_go():
    # Create instance of video capturer
    cv2.namedWindow("face detection activated")
    vc = cv2.VideoCapture(0)

    # try to get the first frame
    if vc.isOpened():
        rval, frame = vc.read()
    else:
        rval = False

    # Keep video stream open
    while rval:
        # Plot image from camera with detections marked
        frame = wear_suglasses(frame, sunglasses)
        cv2.imshow("face detection activated", frame)

        # Exit functionality - press any key to exit laptop video
        key = cv2.waitKey(20)
        if key < 255: # exit by pressing any key
            # Destroy windows
            cv2.destroyAllWindows()

            for i in range (1,5):
                cv2.waitKey(1)
            return

        # Read next frame
        time.sleep(0.05)             # control framerate for computation - default 20 frames per sec
        rval, frame = vc.read()

# Load facial landmark detector model
model = load_model('my_model.h5')

# Run sunglasses painter
laptop_camera_go()
Reference
[1] Facial Keypoints Detection | Kaggle. (n.d.). Retrieved from https://www.kaggle.com/c/facial-keypoints-detection/data